Garage Workshop Setup: Creating an Efficient Work Area
As an Amazon Associate, I earn from qualifying purchases, at no additional cost to you. Disclaimer
Setting up a garage workshop can transform your space into a haven for DIY projects.
Whether you love woodworking, metalwork, or crafting, a well-organized workshop makes it easier and more enjoyable.
The key to a great garage workshop is efficient use of space and having the right tools.

I remember when I first started setting up my workshop. It was exciting to see how organizing tools and setting up different workstations made everything more efficient.
Good lighting and proper storage are crucial. You won’t have to waste time looking for a screwdriver if all your tools are neatly arranged.
Safety is also important in a garage workshop. Having safety gear like goggles and gloves within easy reach helps prevent accidents.
Keeping your workspace clean reduces hazards and allows you to focus more on your DIY projects.
Planning Your Garage Workshop Layout
Creating an effective garage workshop involves careful planning to ensure optimal use of space, efficient workflow, and flexibility for various projects.
I focus on specific needs, including size requirements, workflow design, and dual-purpose layouts.
Determining Space Requirements
First, assessing space is crucial. Measure the entire garage.
I consider ceiling height for vertically stored tools. A floor plan helps visualize where equipment fits.
Essential tools like a workbench, power tools, and storage units need fixed spots. I keep my workspace clear and organized.
Account for parking if needed. Use wall-mounted storage solutions to free up floor space, maximizing room for larger tools and projects.
Considering Workflow and Process
An efficient workflow is key in maintaining productivity.
I map out the steps for common tasks, from preparation to clean-up.
For both metalworking and woodworking, grouping related tools together saves time.
I position power outlets based on tool usage and keep safety in mind with clear walkways. Keeping frequently used tools within reach ensures the process is smooth and reduces frustration.
Dual-Purpose Layouts for Flexibility
I love using dual-purpose layouts for versatility. This approach is perfect for switching between tasks, such as metalworking and woodworking.
Foldable or mobile workstations can be adjusted or moved as needed.
I installed adjustable shelving to accommodate different tool sizes. Dual-purpose designs allow me to adapt to new projects without major overhauls.
Staying flexible while maintaining organization means I’m always ready for a new challenge.
Selecting Workbenches and Workstations
Choosing the right workbench or workstation depends on the space available and the tasks you want to accomplish.
I focus on three main areas: types of workbenches, custom options, and ideas for smaller spaces.
Types of Workbenches
There are various workbench designs to suit different tasks.
Wooden workbenches offer durability and are ideal for woodworking. Metal workbenches provide strength for heavy-duty projects. Foldable workbenches are great for those needing flexibility, as they can be stored easily.
Some workbenches come with built-in storage like drawers and shelves. This helps keep tools organized.
I also like pegboards that can be attached to workbenches to hang frequently used tools within arm’s reach.
Custom-Built Workbenches
For those with unique requirements, a custom-built workbench is an excellent choice.
Building your own allows for personalization, like height adjustments and specific tool holders. It’s possible to use recycled materials, making it an eco-friendly option.
Planning is crucial when building a custom workbench. Consider the tools you use most often and design the bench to hold these securely.
Adjustable benches can accommodate different projects, adding flexibility to your workshop.
Compact Workstations for Small Spaces
Not everyone has a large garage for a massive workbench. Compact workstations solve this problem. These are ideal for apartments or smaller garages.
Wall-mounted workstations save floor space and fold away when not in use.
Using vertical space is key in small areas. Shelves and hooks can keep tools off the ground. Portable workstations can be moved easily and are perfect if you need to work in different locations or save room when cleaning up.
For small spaces, creativity is key in maximizing the area and keeping things functional. An organized setup means a more productive workspace, even when space is tight.
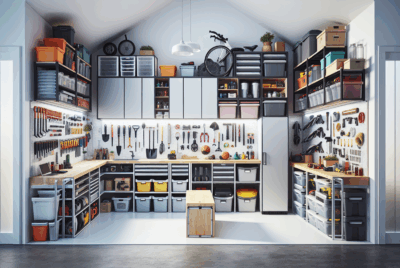
Tool Selection and Storage Solutions

When setting up a garage workshop, choosing the right tools and finding efficient storage solutions are key. It’s crucial to consider both essential hand and power tools and how to store them for easy access and organization.
Good tool storage keeps the space tidy and makes work more enjoyable.
List of Essential Tools
I always start with the essentials. Wrenches, screwdrivers, pliers, and hammers are basic tools that cover many needs. A tape measure and utility knife are also indispensable. Don’t forget a level for all precise setups.
Investing in quality versions of these tools saves time and effort. A solid set of drill bits complements my power drill, which I consider a must.
Power Tools vs. Hand Tools
Power tools are perfect for tasks that require speed and power, like drilling or sanding. They save time and provide more control.
I rely on my power saws and cordless drills for many tasks.
Hand tools, like saws and ratchets, offer precision and do not rely on power sources. They’re great when I need fine control or portability.
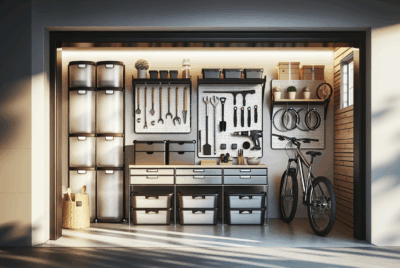
Innovative Tool Storage
Having good storage is essential. I like using modular storage systems that can be adjusted to fit different spaces.
Pegboard walls offer versatility, allowing me to hang frequently used tools. Small boxes and bins are useful for organizing nails, screws, and smaller items.
I customize the layout to suit my workflow, keeping everything within reach.
Rolling Tool Chests
Rolling tool chests are perfect for flexibility in the workshop. They make moving tools around easy.
With multiple drawers, I can organize tools by type or frequency of use. The mobility helps when working on different projects or in different areas. Lockable drawers add security, making sure that everything stays in place and secure.
Wall-Mounted Tool Racks
Wall-mounted tool racks free up floor space. I mount them on pegboards or directly onto walls.
They’re handy for quick access to commonly used tools like hammers and screwdrivers. I particularly like racks that offer adjustable slots for different sizes. This lets me customize them to fit specific tools, maintaining a neat and efficient workshop.
Electrical System and Lighting

Setting up a garage workshop needs a well-planned electrical and lighting system. It’s vital to have enough power for tools and devices and the right lighting for visibility.
Installing Adequate Electrical Outlets
I ensure my garage has enough electrical outlets for all my tools and equipment.
Ideally, there’s at least one outlet every six feet along the workbench and walls. It’s key to have dedicated circuits for high-powered tools like saws or air compressors to avoid overload.
For safety and efficiency, I use GFCI outlets in the garage. These reduce the risk of electrical shock in damp conditions.
Proper planning with an electrician can address the specific power needs of my workshop.
Choosing the Right Garage Lighting
Good lighting is crucial for safety and effectiveness in my workshop.
I prefer LED lighting for its efficiency and bright, clear illumination.
Overhead LED fixtures provide broad lighting coverage while task lighting focuses on specific areas.
Natural light is also important. I incorporate windows or skylights if possible to make use of daylight. When setting up lights, I avoid harsh shadows which can cause strain during detailed work.
Integrated Charging Stations
Having integrated charging stations in my garage helps organize and power my cordless tools and devices.
I set up a dedicated space with outlets or a charging dock for battery packs, avoiding clutter on the workbench.
I use smart chargers to keep batteries healthy by preventing overcharging. This step improves both battery life and overall organization.
A reliable power source close to my work area ensures I always have a ready-to-go set of tools for any project.
Enhancing Workshop Environment

Creating the ideal workspace involves keeping it clean, well-ventilated, and comfortable. A good environment boosts productivity and ensures safety.
Implementing Dust Collection Systems
Dust in a workshop isn’t just messy; it’s a health hazard. Dust collection systems help keep the air clean by capturing dust at its source.
First, I choose the right size system based on the number of tools in the workshop. A small shop might only need a mobile unit, while a larger space could require a central system.
I should also consider the type of dust generated. Fine particles need a system with a high-efficiency filter. Regular filter cleaning is necessary to maintain performance.
To maximize efficiency, I position dust collection ports close to equipment that produces the most dust.
Ventilation Considerations
A workshop needs proper ventilation to ensure fresh air and remove harmful fumes.
I often start by assessing the layout. If possible, I install vents or windows on opposite sides to encourage a cross breeze. This natural flow is effective, especially in smaller spaces.
For enclosed workshops, I might need a mechanical ventilation system. Options include exhaust fans or air filtration units that clear out fumes from paints and solvents.
It’s crucial that any system I install is appropriately sized for the room to work effectively. Checking local building codes ensures compliance and safety.
Climate Control for Comfort
Temperature and humidity greatly affect comfort in a workshop.
For heating, portable electric heaters can be useful in small, insulated spaces. Larger areas might need more permanent solutions like wall-mounted or ceiling heaters.
Consider air conditioning for hot summers. A window unit or portable AC can cool the room.
Climate-controlled workshops maintain consistent temperature and humidity, preventing tool damage from rust or wood warping. I install a dehumidifier in damp conditions to prevent moisture-related issues.
These systems not only make the workshop more enjoyable but also extend the life of tools and materials.
Flooring and Soundproofing
Selecting the right flooring ensures durability, while effective soundproofing minimizes noise. It’s crucial for creating a functional and comfortable workshop.
Choosing Heavy-Duty Flooring
I pick heavy-duty flooring for my garage workshop because it can withstand the weight of heavy tools.
Epoxy-coated floors are a great choice due to their durability and resistance to stains. This type of flooring protects against oil spills, reducing maintenance.
Interlocking floor tiles also work well. They are easy to install and replace if damaged.
Rubber tiles offer cushioning, protecting both my feet and my tools from damage when dropped. Additionally, rubber provides some noise reduction, absorbing sound caused by movement and machinery.
Polished concrete is another solid choice. It’s strong and long-lasting. The smooth surface makes cleaning simple while providing a professional look.
Vinyl flooring is water-resistant, making it a practical option for those worried about moisture.
Soundproofing for Reduced Noise
For soundproofing, I focus on walls, doors, and windows.
Acoustic panels can go on the walls to absorb sound. This reduces noise that travels outside, keeping my neighbors happy. I may use weather stripping for doors and windows. It seals gaps, minimizing sound escape.
I can add mass-loaded vinyl (MLV) to walls or ceilings to block sound. MLV is dense yet thin, effective in preventing noise from leaving the workshop.
Covering windows with thick curtains can also help, as they absorb sound.
Door sweeps help reduce the gap under doors. This makes a huge difference, preventing sound from escaping.
Double-glazed windows may cost more but significantly lower noise levels. Taking these steps allows me to focus on projects without disturbing others.
Organization and Cleanliness
Keeping a garage workshop organized and clean is key for efficient work. It involves regular maintenance, clever storage solutions, and creative ways to keep tools organized. Let’s explore practical ways to achieve this.
Maintaining a Clean Workspace
A clean workspace is easier to work in and safer. I make it a habit to tidy up every day. This means sweeping floors and wiping down surfaces.
Dust and debris can cause accidents, so staying on top of cleaning is crucial.
I also categorize tools and materials. This ensures everything has a place.
I’ve found that using labeled bins and drawers can save a lot of time. It helps me know where each tool belongs and find them quickly when needed.
Overhead Shelving for Additional Storage
Using overhead shelving maximizes space in my garage. It keeps seldom-used items out of the way.
I install strong shelves that can hold weighty items securely. This prevents clutter on the floor and frees up valuable workspace for current projects.
Shelving units come in various materials like metal and wood. I choose sturdy materials to ensure safety.
Adjustable shelves are a plus; they let me customize space as my storage needs change. Proper anchoring is essential to prevent accidents.
Innovative Organization Hacks
Creative organization hacks can make a big difference. For instance, I use magnetic strips on walls to hold metal tools. It keeps my tools within arm’s reach and visible. This saves me from searching through drawers.
Foldable work tables are another handy solution. I set them up as needed, providing extra workspace without taking up permanent room. When not in use, they fold neatly away, maintaining a clean area.
Using pegboards is another favorite trick. They’re versatile and excellent for hanging frequently used tools. This keeps my workshop functional, tidy, and ready for any project.
Workshop Design and Aesthetics
When designing a garage workshop, I focus on both functionality and aesthetics. It’s crucial to have a space that is both practical and visually appealing. This balance can improve productivity and make the workshop an enjoyable place to work.
Functional Design Elements
I start with the layout. Everything should be within reach, especially tools I use frequently.
Organizing workbenches, shelves, and pegboards helps keep the area tidy.
Lighting is important too. Bright LED lights make it easier to see what I’m doing and help me avoid mistakes.
I also think about ventilation, especially for woodworking. Adding a fan or an exhaust system prevents dust from building up and keeps air fresh.
Using sturdy materials for benches and flooring is essential. Durable surfaces can withstand heavy use, which is often required in woodworking.
Aesthetic Improvement Ideas
Color can change the feel of a workshop. I prefer light colors for walls. They reflect light and make the space seem bigger.
Adding a splash of color with tool racks or shelves adds personality. I also use art or posters that inspire me and keep my workspace lively.
Storage solutions can be both practical and beautiful. Wooden cabinets with a varnished finish offer durability and a classic look.
I like to keep the floor free of clutter. This not only improves safety but also enhances the workshop’s appearance. A clean and organized space always looks better.
Frequently Asked Questions
When setting up a garage workshop, I focus on layout, tools, space optimization, cost, ventilation, lighting, and storage. The right balance of these elements ensures an efficient and safe workspace.
What are essential considerations when planning a garage workshop layout?
I always start by measuring the space and sketching a layout. Working around existing features like doors and outlets helps.
I position workbenches near the power source and ensure there’s enough room to move around comfortably.
Which tools and equipment are must-haves for a small garage workshop?
In my experience, basic tools include a hammer, screwdriver set, power drill, and tape measure.
For bigger projects, I add a saw, a sander, and a workbench. It depends on the projects I plan to tackle.
How can I maximize space in a limited-size garage workshop?
I make use of vertical space by installing shelves and pegboards.
Folding workbenches are a smart choice if I’m tight on space. Keeping the floor clear helps make the area feel larger.
What are cost-effective methods for building a garage workshop?
Repurposing old furniture for workbenches or storage can save money. I also look for sales and consider buying second-hand tools. DIY projects for workspaces can reduce costs significantly.
How can I ensure proper ventilation and lighting in my garage workshop setup?
Good lighting is key, so I install bright LED lights.
For ventilation, I make sure windows can open or install an exhaust fan. This keeps the air fresh and reduces dust accumulation.
What are the best storage solutions for organizing a garage workshop?
Using modular storage units helps keep things tidy. I prefer labeled bins for small items. I also use a pegboard to hang frequently used tools. Keeping everything accessible makes projects smoother.