Maximize Your Space with a Garage Organizer Wall

As an Amazon Associate, I earn from qualifying purchases, at no additional cost to you. Disclaimer
Have you ever struggled to find space for your tools, sports equipment, or seasonal decorations in your garage? It’s easy to feel overwhelmed when items seem to pile up, and suddenly the usable space you once had is nowhere to be found. A garage can transform from a chaotic cluttered space to an organized haven with the right solutions. One of the best ways to achieve this is by installing a garage organizer wall.
Click Here to Organize Your Garage Today
Understanding the Importance of Garage Organization
A well-organized garage not only makes your life easier but also enhances the effectiveness of how you use your space. Imagine being able to quickly locate your gardening tools or access your bicycle without tripping over clutter. It’s not just about tidiness; it’s about creating an environment where every inch of space serves a purpose.
Benefits of a Neat Garage
Keeping your garage organized brings multiple benefits. Besides the obvious aesthetic appeal, it can reduce stress as it prevents the frustration of searching for misplaced items. Additionally, it increases safety, minimizing the risk of accidents caused by stumbling over scattered tools or other items. Furthermore, a clean and organized space can enhance your home’s value and appeal, particularly if you’re considering selling.
Common Challenges in Garage Organization
One of the biggest challenges in garage organization is underestimating the need for dedicated storage options. Garages often end up as catch-all spaces for items that don’t have a designated place in your home. Without a proper system, it’s easy for things to spiral into chaos. Recognizing these common challenges is the first step towards creating an efficient garage.
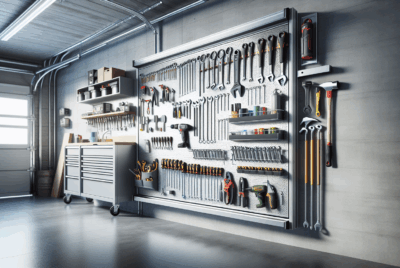
What is a Garage Organizer Wall?
Before diving into the setup, it’s essential to understand what a garage organizer wall entails. Essentially, it’s a system that uses the vertical space of your garage to store items in a methodical and accessible manner. This system may include slatwalls, pegboards, and panels, among other components, to hold hooks, baskets, and shelves.
Components of a Garage Organizer Wall
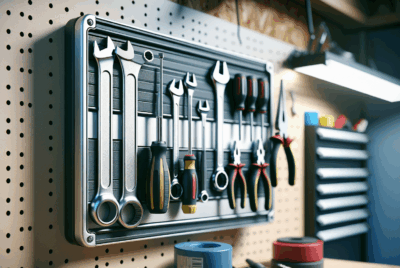
- Slatwalls: These are panels with grooves designed to hold various types of hooks and accessories, allowing for infinite customization.
- Pegboards: Classic for a reason, pegboards offer a grid of holes where you can place pegs at your discretion to hang tools and other lightweight items.
- Shelving Units: Integral for storing larger items, shelves installed on your garage wall help offload the floor.
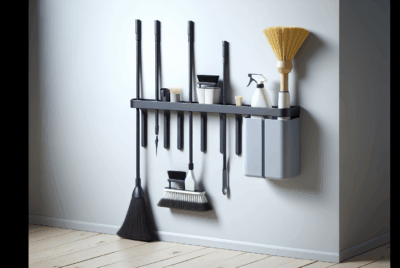
- Hooks and Hangers: Essential for hanging everything from bicycles to garden hoses.
- Bins and Baskets: Useful for smaller, loose items that don’t have a natural place elsewhere.
Choosing the Right Organizer Wall for Your Needs
Different garages have different needs. Understanding what works best for your space, preferences, and the types of items you have is crucial. Consider the weight and volume of your heaviest items to choose materials that can bear the load over time. Combine different types of organizer wall components to cater to both heavy-duty and lightweight storage requirements.

Click Here to Maximize Your Garage Space
Planning Your Garage Organizer Wall
The key to an efficient garage organizer wall lies in the planning phase. Before gathering tools and materials, a detailed plan aligned with your storage needs and garage layout is essential.
Assessing Your Garage Space
Start by measuring the dimensions of your garage and identifying the available wall space. Consider how much of this space is free primarily from windows, doors, or other fixtures. Note unwanted obstacles that might need to be worked around or require creative solutions.
| Factors to Consider | Description |
|---|---|
| Wall Space | Measure the dimensions considering fixtures like windows or doors. |
| Floor Space | Identify areas in front of the wall that need to remain clear, like for car parking. |
| Traffic Flow | Ensure the layout doesn’t impede movement within the garage. |
Inventory and Categorization of Items
Make an inventory of all the items you plan to store in your garage. Group similar items together like sports equipment, seasonal decorations, tools, etc. This approach helps in understanding how much space each category requires and aids in the selection of suitable storage solutions.
Creating a Layout
Sketch a rough layout of where each category of items could go on your organizer wall. Place frequently used items in easily accessible spots and consider your workflow, how you move about in the garage, and where you’d naturally expect to find or place things.
Installing Your Garage Organizer Wall
Once planning is complete, you can move on to the exciting part—installation. Depending on your DIY skills and tool availability, you might opt for a professional installation or tackle it yourself.
Necessary Tools and Materials
Before beginning, gather all necessary tools and materials. General tools might include a power drill, level, stud finder, measuring tape, and appropriate fasteners.
Example Tool List:
- Power drill
- Level and measuring tape
- Stud finder
- Hacksaw (for cutting panels if necessary)
Step-by-Step Installation Process
- Preparation: Clear your garage wall area and make sure all necessary tools are at hand.
- Locate Studs: Use a stud finder to locate and mark the wall studs; these will be critical anchor points.
- Position Panels: Begin by attaching panels like slatwalls or pegboards, ensuring they align with your previously marked stud locations.
- Install Shelving and Hooks: Once the panels are securely in place, position shelves and insert hooks in desired locations.
- Test Stability: After installing the components, give them a gentle tug to ensure everything is firmly attached.

Click Here to Find the Perfect Storage Solution
Maximizing Functionality and Flexibility
The final step is filling your garage organizer wall, but there are additional steps to enhance its functionality and flexibility over time.
Adapting and Updating Your System
Your storage needs aren’t static, so your garage wall organizational system shouldn’t be either. Consider periodic reviews and potential updates based on new acquisitions or changes in lifestyle.
- Seasonal Adjustments: Rotate out seasonal items as needed, storing away those not in use.
- Routine Checks: Regularly verify that all attachments and hooks are secure and not overloaded.
- Long-Term Solutions: As children grow and hobby interests evolve, make mental notes of how the system might need to adjust or expand.
Tips for Keeping Organized Long-Term
Maintaining organization in the long run involves a strategy. Regular cleaning, having a place for everything, and developing a return-to-storage habit will help maintain the organization.
Conclusion
Maximizing your garage’s space with an organizer wall is a practical solution designed to combat clutter while promoting efficiency and safety. With careful planning and periodic maintenance, this system can drastically improve how you utilize garage space. Whether for storage or as a functional workspace, investing time in creating an organizer wall can make a meaningful difference in your everyday life. By implementing these strategies, you can reclaim your garage and ensure every tool, decoration, and piece of sporting equipment is easily accessible, making your life just a little bit easier.